So, while watching late-night television one night, they had a commercial for an upside down tomato plant. It was some sort of a cone shaped deal ("act now, and we'll throw in an additional-insert product name here-for free!) and it didn't trip my trigger, but it sure got me thinking.
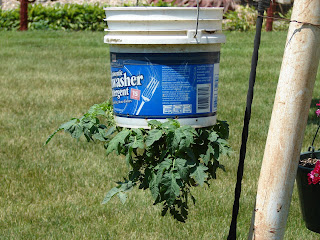
That following week, I did some scrounging around in the garage and shed, and I found what I think is the perfect upside down tomato planter. It's a simple 2.5 gallon bucket with a metal handle. I drilled some small holes in the side and bottom for water drainage and then cut out about a 1.25" hole in the center of the bottom for the tomato plant to fit through. In thinking about the future plant's weight, I decided that the system needed a membrane of some sort that the root system would fit through, so I used a scrap piece of foam underlay for a recently installed laminate floor. I cut this in a small square, just slightly bigger (probably 3" square) than the hole that was cut in the bottom of the bucket, and cut an X shaped slit in the membrane.
Next, I had to find a tomato plant, so went out and purchased one that had a good start on it and carefully transplanted it to the bucket. To do this, you have to remove some of the soil backed around the root system and then shove what remains up through the hole in the bottom of the bucket, then take the membrane, and push the plant through the membrane to a hight that seems like the right depth for planting. Now, while someone holds the bucket and the plant, you fill the bucket with potting soil (or good planting dirt) and poof, you are done.
Now you need to hang the bucket somewhere. First thing I tried was a shepherds hook plant hanger. That worked great for awhile, but we had a huge storm about a week and a half into first effort, and the shepherds hook fell over and damaged the stem of the tomato plant. I thought for about 5 days after the storm that the plant was going to make it, but alas, no good. So, undaunted, had my wife go and find me another tomato plant and I started over.
It was the end of the good tomato's at the various shops, so ended up with 3 really scraggy tomato plants that looked like they were on their last legs. They had some green in them, so I thought we'd give it a try. Not knowing which of the plants (if any) were going to survive, however, we planted them all in the same bucket. I didn't have anything other than the shepherds hook free to hang them on, so I used the shepherds hook at the end of the cloths line and tied it with wire to the metal pole. It's not going down this time.

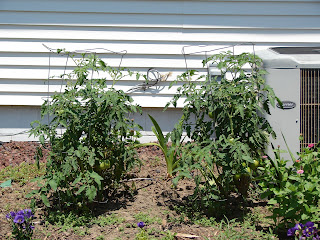
The results have been slow in coming, put two weeks after the planting or so, we have a nice tomato bush growing out of the bottom of the bucket. It has a long ways to go to catch up with my two other plants that were planted quite some time ago, but it looks like the plant will bear fruit at some point. We have our first blossom now, so the rest is a waiting game. I've got a vision for next year if the current system works, that will expand on the upside down tomato theme even further.
